

Going to Production with Monetization
You have built out your monetization configuration in Stripe test mode and your customers are ready to pay real money. This guide covers:
- The pre-production checklist: items to verify before enabling real charges
- Billing model readiness: which pricing models are production-ready today
- Stripe live-mode cutover: step-by-step instructions to connect live payments
- Known limitations: constraints to design around before launch
Before you start
Going to production with monetization requires coordination with the Zuplo team to confirm your configuration and enable your production bucket for live billing.
Email sales to go live
Email sales@zuplo.com with:
- Your account slug and project slug
- The Stripe account ID you plan to use in production
- Your target go-live date
- A summary of your pricing model (flat-fee, overages, pay-as-you-go, etc.)
The Zuplo team will confirm your configuration, walk you through any considerations for your use case, and enable your production bucket for live billing.
Pre-production checklist
Work through each item before enabling real charges. The summary table lists every check; the sections below give the detail and links.
| # | Check | Why it matters |
|---|---|---|
| 1 | Authentication provider verified | Customers cannot sign in, subscribe, or manage keys without it |
| 2 | Meters, features, plans configured | Configuration is per-bucket and does not promote between environments |
| 3 | Stripe live-mode connected | Test keys and live keys are completely separate environments |
| 4 | Billing profile configured | Tax calculations and supplier country depend on it |
| 5 | Webhook endpoint validated | Payment events (charges, failures, disputes) must reach Zuplo |
| 6 | Quota behavior chosen and tested | Hard vs. soft limits change customer experience and billing |
| 7 | Subscription lifecycle tested | Every state transition must work before real money is on the line |
| 8 | Payment grace period configured | Controls when overdue customers lose API access |
Authentication provider verified
Your Developer Portal must have an authentication provider configured so that customers can sign in, subscribe, and manage their API keys. Verify that your auth provider (Auth0, Clerk, or a custom OpenID Connect provider) works correctly across all environments: working copy, preview, and production.
See Developer Portal Setup → Prerequisites for details.
Meters, features, and plans configured
Confirm that your production bucket has the same meters, features, and plans you tested in your working-copy or preview bucket. Monetization configuration is scoped per-bucket, so you must recreate it in production. It does not automatically promote between environments.
Key checks:
- Meter keys match policy configuration. The meter
slug/eventType, the featurekey, and themetersmap in yourMonetizationInboundPolicymust all use the same key. See Meters → Naming Consistency. - Plans are published. Draft plans are not visible to customers. Publish each plan from the Monetization Service in the Zuplo Portal.
- Currency is correct. Plans support any ISO 4217 currency code (USD, EUR,
AUD, GBP, etc.). Verify the
currencyfield on every plan. It cannot be changed after a plan is created. - Plan ordering is set. The
monetization configuration
planOrderarray controls both the pricing page display order and upgrade/downgrade logic. Make sure it reflects your intended tier hierarchy.
Stripe live-mode connected
Your production environment must use a Stripe live key (sk_live_* or
rk_live_*). Test keys and live keys are completely separate environments in
Stripe. Customers, invoices, and payment methods created in test mode do not
exist in live mode.
Use a restricted key (rk_live_*) rather than a secret key. A restricted
key follows the principle of least privilege. See
Using a Stripe restricted key
for the exact eight permissions your key needs.
Use one Stripe key type per Zuplo environment. Do not replace a test key with a live key in the same environment. Zuplo rejects a live key on a non-production bucket and a test key on a production bucket.
Billing profile configured
Every bucket that processes payments needs a default billing profile. The billing profile is created automatically when you connect Stripe, but you should verify:
| Setting | What to check | Reference |
|---|---|---|
| Supplier country | Set correctly. Tax calculations depend on this value | Enable tax collection |
| Tax collection | Tax registrations added in Stripe and workflow.tax.enabled set | Add tax registrations in Stripe |
| Tax behavior | Inclusive vs. exclusive matches your pricing page | Tax behavior configuration |
Webhook endpoint validated
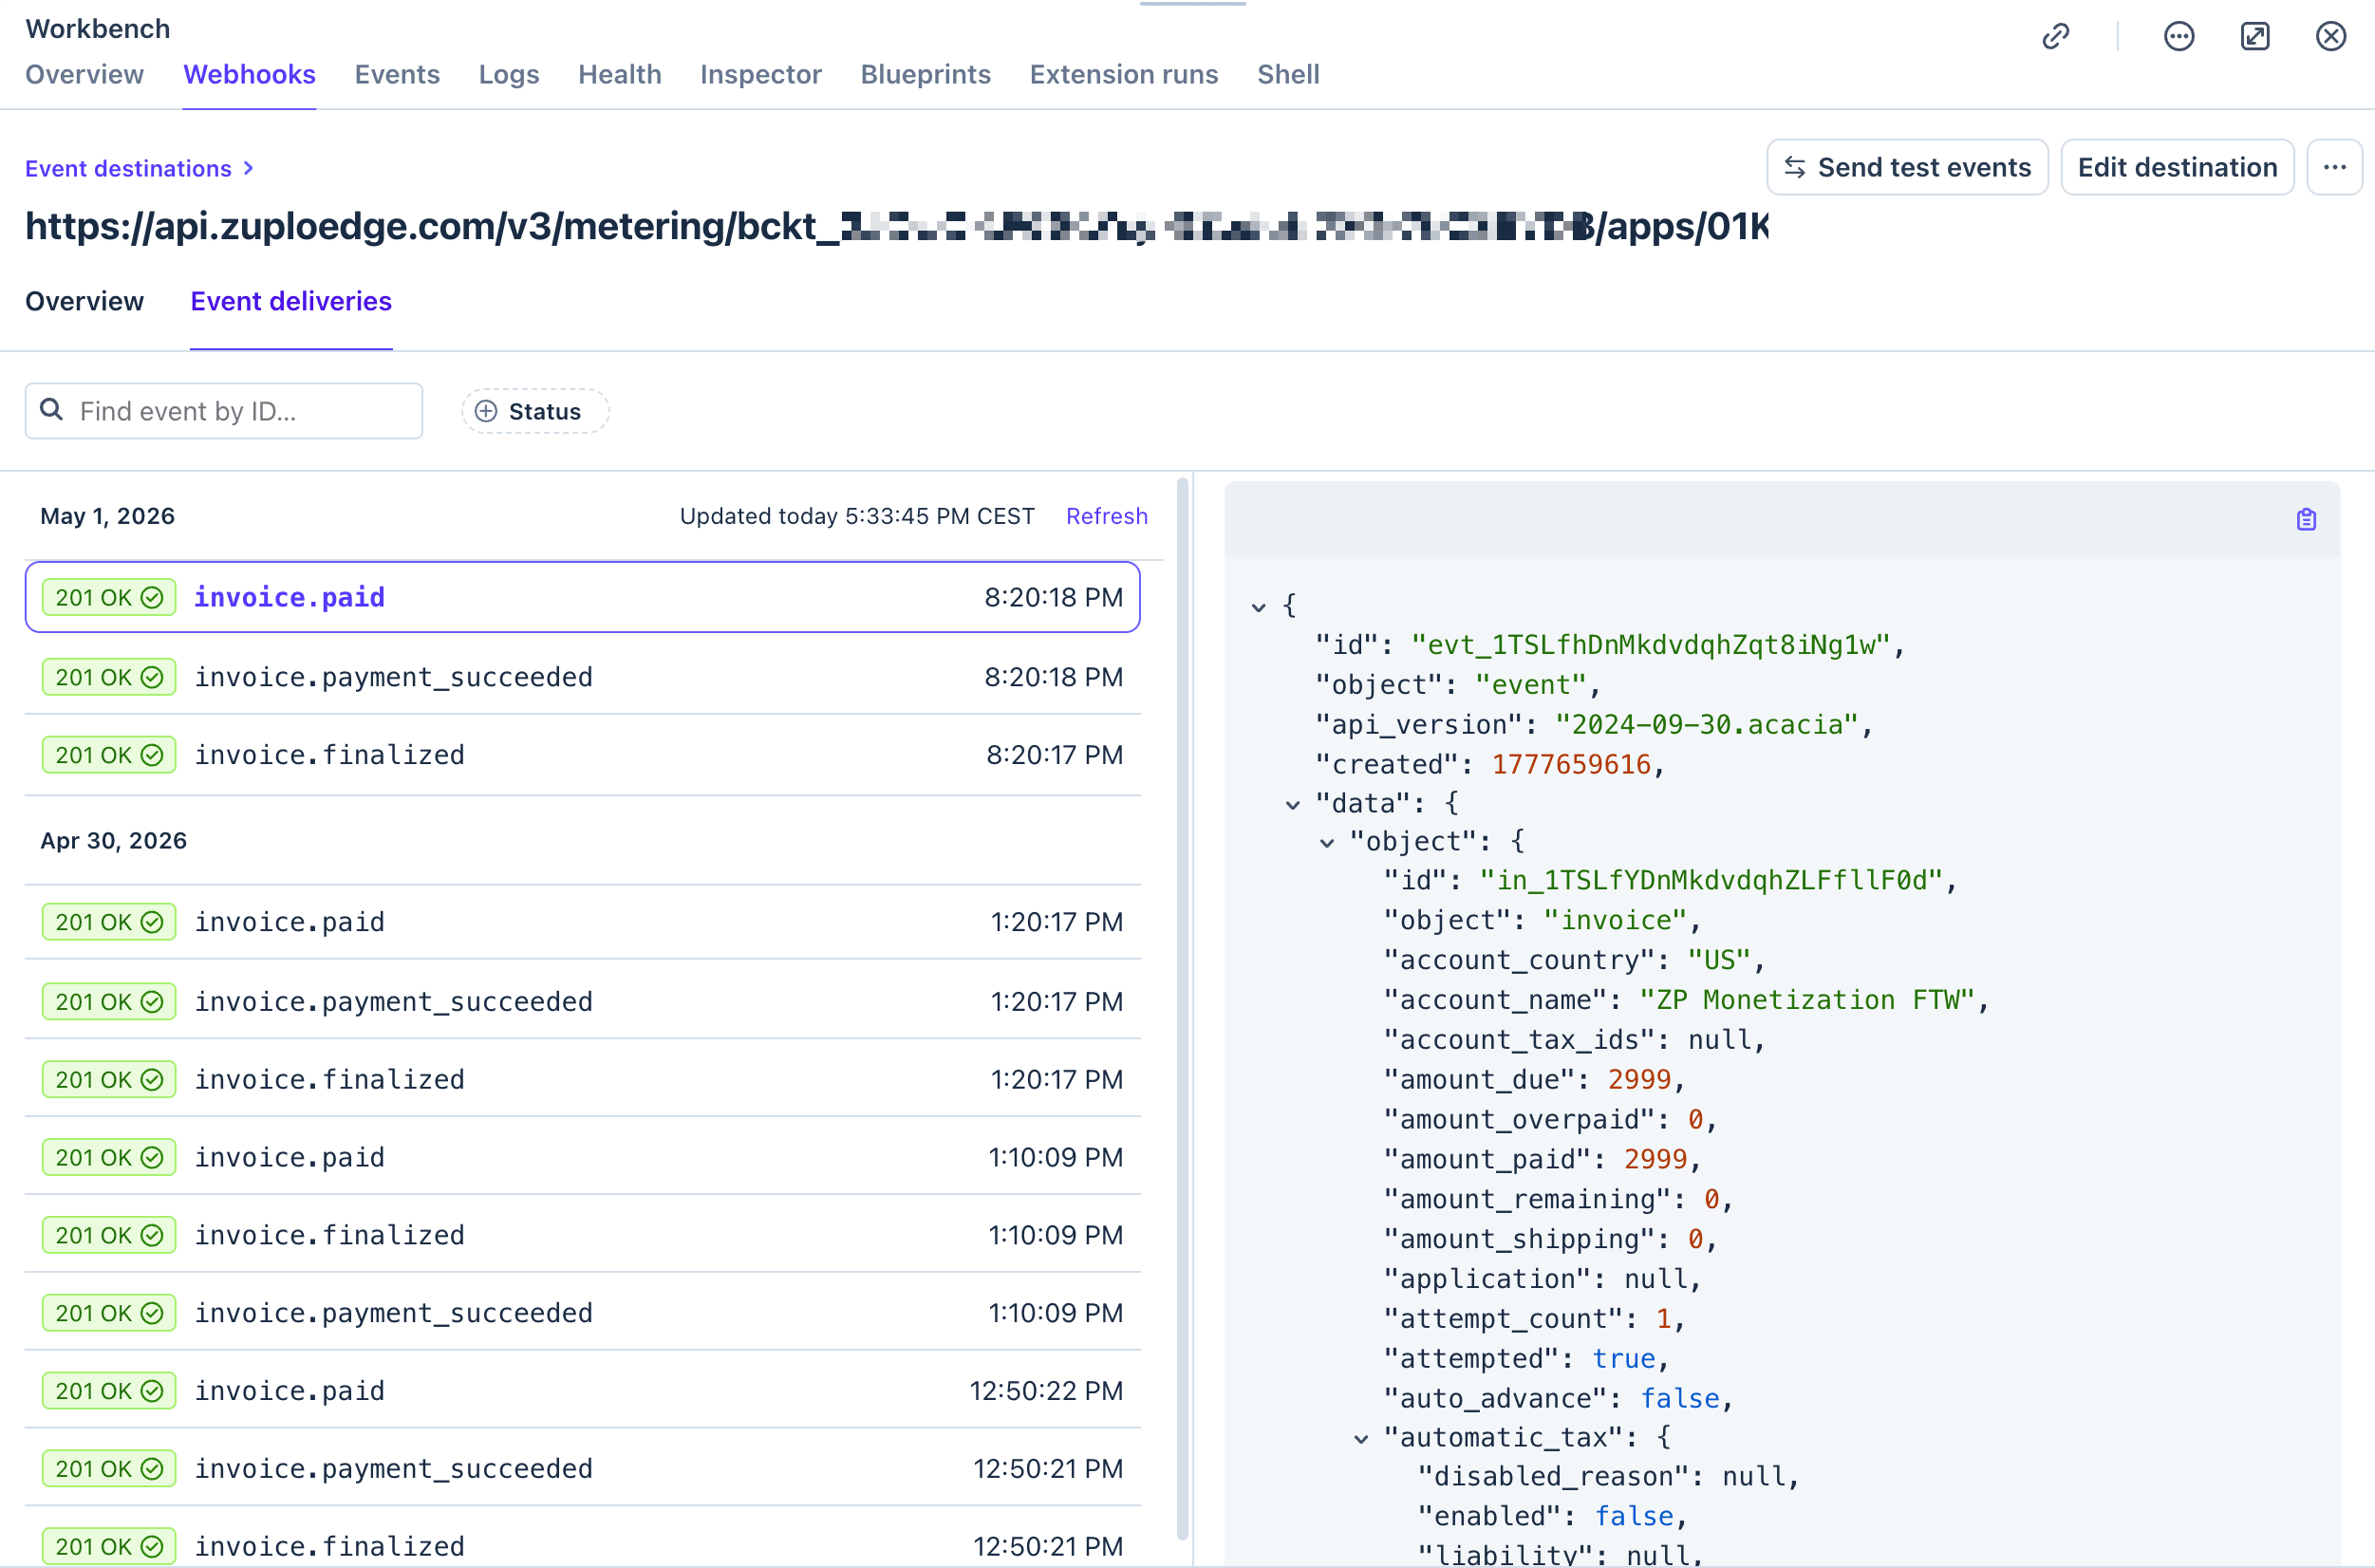
When you connect Stripe, Zuplo registers a webhook endpoint automatically so it can react to payment events (successful charges, failed payments, disputes). Verify the webhook is healthy:
-
Open your Stripe Dashboard → Developers → Webhooks.
-
Find the Zuplo-managed endpoint.
-
Confirm recent deliveries show
2xxresponses (typically201 OK), not failures or timeouts.
Quota behavior chosen and tested
Each metered entitlement can enforce a hard limit or a soft limit:
| Setting | Quota exhausted behavior | Overage billed? |
|---|---|---|
isSoftLimit: false | Returns 403 Forbidden | No |
isSoftLimit: true | Request allowed, usage continues | Yes, per-unit in arrears |
Test both paths in your working-copy environment before going live:
-
Subscribe to a plan with a low quota (e.g., 10 requests).
-
Exceed the quota and verify the correct behavior: either a
403response (hard limit) or continued access with usage counting above the entitlement (soft limit). -
Check the Stripe test dashboard to verify that invoices include the expected line items.
See Rate Cards for how isSoftLimit and issueAfterReset
interact, and Monetization Policy Reference for how
the gateway enforces limits.
Subscription lifecycle tested
Before real money is on the line, walk through every lifecycle state:
| State | How to test |
|---|---|
| Subscribe | Subscribe to a plan via the Developer Portal using Stripe test cards |
| Upgrade | Move from a lower plan to a higher plan. Entitlements should change immediately and the proration credit should appear on the next invoice |
| Downgrade | Move from a higher plan to a lower plan. The change should take effect at the next billing cycle, not immediately |
| Cancel | Cancel a subscription. Access should continue until the billing period ends, then be revoked |
| Reactivate | Reactivate a canceled subscription before the period ends. Access should be restored |
| Failed payment | Use Stripe test card 4000 0000 0000 0341 (attaches to customer but fails on charge) to verify grace period behavior and that access is blocked after the configured maxPaymentOverdueDays |
See Subscription Lifecycle for the full details on each state transition.
Payment grace period configured
The default grace period for overdue payments is 3 days. During this window, customers retain API access while Stripe retries the charge. After the grace period, access is blocked.
You can customize the grace period at three levels. Higher precedence overrides lower:
| Precedence | Where | Field / Key |
|---|---|---|
| 1 (highest) | Stripe customer metadata | zuplo_max_payment_overdue_days |
| 2 | Stripe plan metadata | zuplo_max_payment_overdue_days |
| 3 (lowest) | Bucket monetization config | maxPaymentOverdueDays (reference) |
Set the value to 0 to block access immediately when payment fails.
Billing models in production
Choose the right model for your launch based on current readiness.
| Model | Status | Notes |
|---|---|---|
| Fixed monthly quotas | Production-ready | Fully supported end-to-end |
| Monthly quotas with overages | Production-ready | Modeled as graduated tiered pricing with isSoftLimit: true |
| Pay-as-you-go | Production-ready | Bill entirely in arrears for actual usage |
| Credits / tokens (prepaid) | Coming soon | Underlying model works; portal experience not yet shipped |
Fixed monthly quotas (production-ready)
The most common and most stable model. Customers pay a flat monthly price for an
included number of requests. When the quota is exhausted, the API returns
403 Forbidden (hard limit) or bills overages (soft limit).
This model is fully supported in the Developer Portal pricing table, checkout flow, usage dashboard, and invoicing.
See Billing Models → Fixed monthly quotas for configuration examples.
Monthly quotas with overages (production-ready)
A hybrid model where customers pay a base price for an included allowance, with
per-unit overage billing in arrears for usage above the limit. This is modeled
using graduated tiered pricing with isSoftLimit: true.
Fully supported end-to-end. See Billing Models → Monthly quotas with overages for examples.
Pay-as-you-go (production-ready)
Pure pay-as-you-go billing — no upfront cost, bill entirely in arrears for actual usage — is fully supported end-to-end.
See Billing Models → Pay-as-you-go for the data model and configuration.
Credits / tokens (prepaid, coming soon)
Credit/token-based billing is supported by the underlying data model, but the Developer Portal experience has not been fully tested for this billing model yet.
If you need prepaid credit billing, contact sales@zuplo.com to discuss your use case.
See Billing Models → Credits / tokens for configuration examples.
How usage metering works with Stripe
A common point of confusion: Zuplo does not use Stripe Billing Meters, Stripe Subscriptions, Stripe Products, or Stripe Prices. Zuplo manages plans, subscriptions, metering, and entitlements internally. Stripe is used only for money: collecting payments and issuing invoices.

The flow works like this:
- Every API request that hits a monetized route is metered in real time by the
MonetizationInboundPolicy. - Usage events are aggregated internally by Zuplo. They are not sent to Stripe as individual events.
- At the end of each billing period, Zuplo calculates the total usage, applies the plan's pricing model (flat fee, tiered, per-unit, etc.), and creates a Stripe Invoice with the appropriate line items.
- Stripe collects payment from the customer's saved payment method.
This means you will not see usage events, billing meters, or subscription objects in your Stripe dashboard. You will see Customers and Invoices. To check usage and subscription state, use the Zuplo metering API or the Developer Portal's usage dashboard.
Why usage events might not appear in Stripe
If you expected to see per-request usage events in Stripe and they are not there, this is by design. Zuplo does not call Stripe's metered billing APIs. Usage is materialized as invoice line items at billing time only.
To verify that metering is working:
- Make API requests to a monetized endpoint.
- Check the Developer Portal usage dashboard. It should show real-time usage.
- Query the meter directly via the API:
Code
If the usage dashboard shows zero despite active traffic, see Troubleshooting → Usage dashboard shows zero.
Connecting Stripe live mode
When your test configuration is validated and you are ready to accept real payments, follow these steps to connect your production environment to Stripe live mode.
Step 1: Create a Stripe restricted key for production
-
In the Stripe Dashboard, switch to live mode (toggle in the top-right corner).
-
Go to Developers → API keys → Create restricted key.
-
Name the key
Zuplo Monetization (production). -
Enable the eight permissions listed in Using a Stripe restricted key.
-
Click Create key and copy the value (
rk_live_...).
Step 2: Connect to your production environment
-
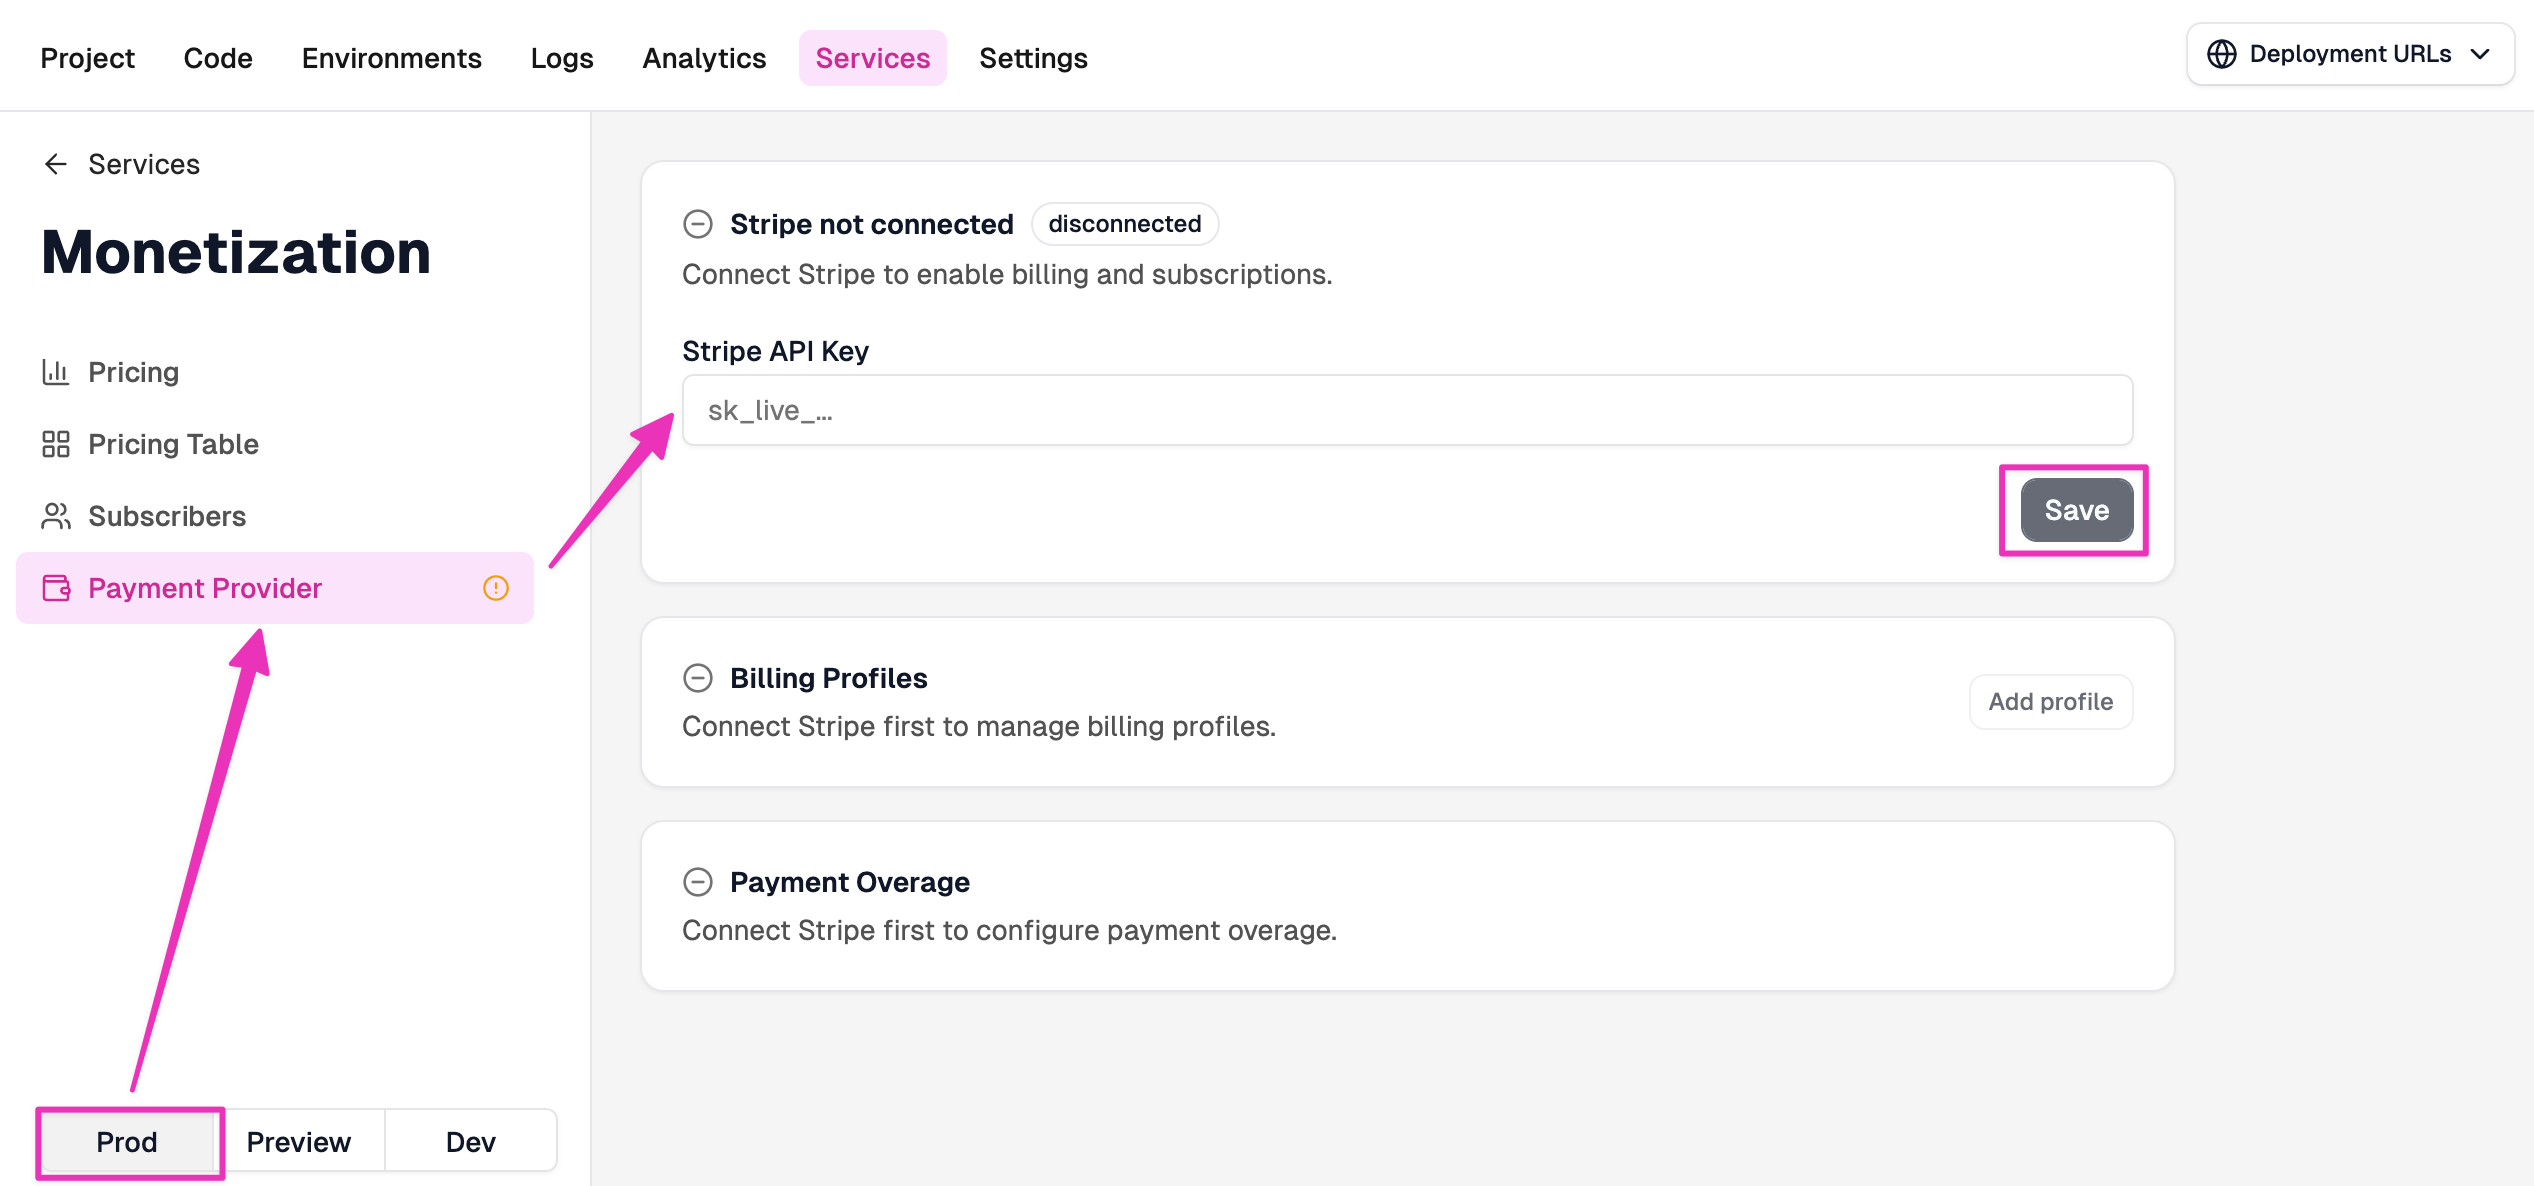
Open your project's Services page in the Zuplo Portal.
-
Select the Production environment.
-
Open the Monetization Service, then go to Payment Provider.
-
Paste your live restricted key (
rk_live_...) and click Save.
Step 3: Recreate your monetization configuration
Because monetization configuration is scoped per-bucket, you need to set up meters, features, plans, and the monetization configuration in your production bucket. You can do this through the Portal UI or via the monetization APIs.
Step 4: Verify with a real charge
-
Publish at least one plan in your production environment.
-
Open the Developer Portal on your production URL.
-
Subscribe to a plan using a real payment method.
-
Confirm in the Stripe Dashboard (live mode) that a Customer was created and the Webhook endpoint is registered and showing
2xxresponses. -
Make a few API requests and verify the usage dashboard updates.
-
Cancel the test subscription when done.
Step 5: Monitor first production transactions
After going live, keep a close eye on:
| Surface | What to check |
|---|---|
| Stripe Dashboard → Invoices | Invoices are created at the end of each billing period with the correct line items |
| Stripe Dashboard → Webhooks | All webhook deliveries are succeeding |
| Developer Portal → Usage Dashboard | Customer-facing usage numbers match your expectations |
| API responses | Monetized routes return 200 for subscribed customers and 403 for over-quota requests |
Known limitations
The following limitations apply today. Design around them when planning your production launch. As noted in Before you start, production access requires coordination with the Zuplo sales team.
Credits / tokens portal experience
Credit/token-based billing is supported by the underlying data model and APIs, but the Developer Portal pricing table has not been fully tested for this model. If your business requires prepaid credits, coordinate with Zuplo support for guidance on workarounds.
Configuration does not promote between environments
Meters, features, plans, and monetization configuration are scoped to individual buckets. There is no built-in promotion mechanism to copy configuration from working-copy to production. You must recreate or script the configuration in each environment separately using the APIs documented in API Access.
Single active subscription per customer (default)
By default, each customer can hold one active subscription at a time. Multi-subscription support (e.g., a primary subscription plus a credit pack) is available on request. Contact sales@zuplo.com to enable it for your bucket.
See Subscription Lifecycle → Subscriptions per customer for details on multi-subscription scenarios.
Zuplo plan requirements for monetization
Monetization is available on all Zuplo plan tiers. For current plan details and pricing, see the Zuplo pricing page.
Getting help when going live
Email sales@zuplo.com when you're ready to enable production billing for the first time, or to discuss multi-subscription support.
What to include in your request
To help the team resolve your issue quickly, include:
| Field | Where to find / what to provide |
|---|---|
| Account slug | Your Zuplo account identifier |
| Project slug | The project with monetization enabled |
| Bucket ID | Project Services → Bucket Details |
| Stripe account ID | Stripe Dashboard → Settings, starts with acct_ |
| Plan keys | The plan keys involved in the issue |
| Subscription ID | If the issue is subscription-specific |
| Steps to reproduce | What you did, what you expected, what happened instead |
Next steps
Once you have completed the checklist, connected Stripe live mode, and verified your first real charge, your monetized API is in production. Monitor your Stripe Dashboard webhooks and invoices closely during the first billing cycle.
- Troubleshooting: common issues and debugging tools
- Subscription Lifecycle: managing ongoing upgrades, downgrades, and cancellations
- Billing Models Guide: exploring additional pricing strategies as your business grows